If your PC is still running Windows 10, upgrading to Windows 11 is now more important than it was a few years ago. Microsoft ended normal support for Windows 10 on October 14, 2025, so a standard Windows 10 installation no longer receives the same regular free security updates and support it once did.
The good news is that upgrading from Windows 10 to Windows 11 is still free for eligible PCs. If your computer meets Microsoft’s Windows 11 requirements and Windows 10 is properly activated, you can normally move to the corresponding Windows 11 edition without buying another license.
For most people, the safest method is Windows Update. Open Settings > Update & Security > Windows Update, check for updates, and install Windows 11 when Microsoft says the upgrade is ready for your device.
I recommend checking compatibility and backing up important files before starting. Windows 11 has stricter hardware requirements than Windows 10, particularly around TPM 2.0, Secure Boot capability, supported processors, and UEFI firmware.
Quick Answer: How to Upgrade From Windows 10 to Windows 11
For an eligible Windows 10 PC:
- Back up your important files.
- Install all available Windows 10 updates.
- Check the PC with Microsoft’s PC Health Check app.
- Open Settings > Update & Security > Windows Update.
- Click Check for updates.
- If Windows 11 is offered, click Download and install.
- Accept the license terms.
- Wait for Windows to download and prepare the upgrade.
- Click Restart now when prompted.
- Let the computer restart several times.
- Sign in when Windows 11 finishes installing.
- Check activation, Windows Update, drivers, and your important applications.
Do not force the computer off while Windows is actively installing the upgrade.
Is the Windows 10 to Windows 11 Upgrade Still Free?
Yes.
Microsoft currently states that upgrades from Windows 10 to Windows 11 are free for eligible PCs.
The edition normally stays the same:
- Windows 10 Home upgrades to Windows 11 Home
- Windows 10 Pro upgrades to Windows 11 Pro
You are not automatically upgraded from Home to Pro.
Before upgrading, press Windows + R, type:
winverand press Enter to check the current Windows version and edition.
You can also open:
Settings > System > About
and look under Windows specifications.
Why Upgrade From Windows 10 Now?
Windows 10 reached end of support on October 14, 2025.
A Windows 10 PC does not suddenly stop working because support ended. Programs and personal files may continue working normally.
The issue is long-term security and support.
Moving to Windows 11 gives an eligible PC access to Microsoft’s currently supported Windows platform, including current security updates, newer Windows features, and newer hardware and application support.
If your computer cannot officially run Windows 11, I cover the safer options later instead of treating an unsupported installation as the default solution.
Check Whether Your PC Can Run Windows 11
Microsoft reference: Windows 11 specifications and system requirements | PC Health Check app
Microsoft’s minimum Windows 11 requirements include:
- A compatible 64-bit processor running at 1 GHz or faster with at least two cores
- 4 GB of RAM
- 64 GB or more of storage
- UEFI firmware
- Secure Boot capability
- TPM 2.0
- DirectX 12-compatible graphics
- A display larger than 9 inches with at least 720p resolution
Meeting the basic RAM and storage numbers alone does not guarantee eligibility. The processor also needs to be supported, and Windows checks other compatibility information.
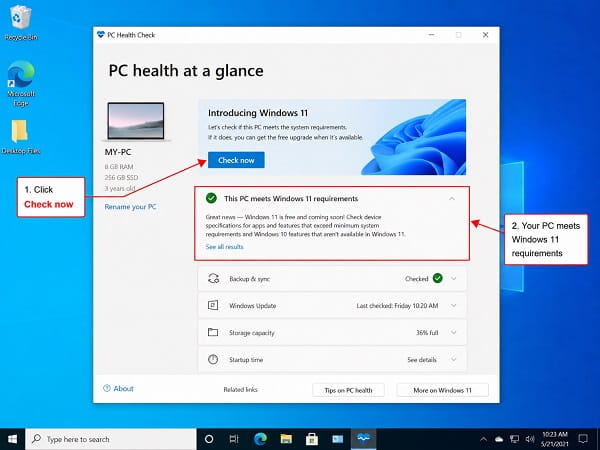
The easiest way to get a clear result is Microsoft’s PC Health Check app.
Use PC Health Check Before Upgrading
Install and open PC Health Check.
Then:
- Find the Windows 11 section.
- Click Check now.
- Read the compatibility result.
If the PC qualifies, you can proceed.
If it does not qualify, PC Health Check may identify the reason.
Typical causes include:
- TPM 2.0 is disabled
- Secure Boot is unavailable or disabled
- The processor is unsupported
- The system is using an incompatible firmware configuration
- Another hardware requirement is not met
Do not immediately assume the computer is too old just because TPM or Secure Boot appears unavailable. On some PCs, those features exist but are disabled in UEFI or BIOS.
Check Whether TPM 2.0 Is Enabled
Press:
Windows + R
Type:
tpm.mscPress Enter.
Look for:
Specification Version
If it shows:
2.0
the TPM version meets the Windows 11 requirement.
If Windows says a compatible TPM cannot be found, the feature may be disabled in firmware.
Different manufacturers use names such as:
- TPM
- Intel PTT
- Platform Trust Technology
- AMD fTPM
- Firmware TPM
- Security Device Support
If you need to enter firmware settings, see How to Open BIOS in Windows 11. The same UEFI access methods are useful when preparing a Windows 10 PC for Windows 11.
Do not change unrelated BIOS settings.
Check Secure Boot and UEFI Mode
Press:
Windows + R
Type:
msinfo32Press Enter.
In System Information, look for:
BIOS Mode
and:
Secure Boot State
Ideally, BIOS Mode should show UEFI, and Secure Boot should be available.
If BIOS Mode shows Legacy, moving the system to UEFI can require additional preparation.
Do not simply switch Legacy or CSM to UEFI in firmware without checking how Windows is installed. A mismatched boot mode can stop Windows from starting.
If you are considering a firmware update, first identify the installed firmware with How to Check BIOS Version on Windows 11. Only install firmware intended for your exact laptop or motherboard model.
Check Windows 10 Activation
Before upgrading, open:
Settings > Update & Security > Activation
Windows should show that it is activated.
If activation is already broken, fix that first when possible.
A properly activated eligible Windows 10 installation normally activates the corresponding Windows 11 edition automatically after the upgrade.
You usually do not need to purchase or enter another product key during an ordinary in-place upgrade.
Update Windows 10 First
Microsoft recommends installing available updates for the current Windows version before expecting the Windows 11 upgrade to appear.
Open:
Settings > Update & Security > Windows Update
Click:
Check for updates
Install available updates and restart the PC.
Then check again.
Windows 11 may not be offered until required Windows 10 updates are installed.
Back Up Important Files Before Upgrading
A supported Windows 10 to Windows 11 upgrade is designed to preserve personal files and applications.
Even so, I would never begin a major operating-system upgrade without a backup.
Back up:
- Documents
- Photos
- Videos
- Work files
- Browser data that is not synced
- Password databases
- Project files
- Game saves that are not cloud-synced
- Important downloads
- Application license information
You can use OneDrive, an external SSD, an external hard drive, a NAS, or another trusted backup location.
For irreplaceable files, keep more than one copy.
Save Your BitLocker Recovery Key
If the PC uses BitLocker or device encryption, make sure you can access the recovery key before changing TPM, Secure Boot, or other firmware settings.
Firmware changes can trigger a BitLocker recovery prompt.
Do not wait until the PC is asking for the key to find out whether you have it.
On a managed work PC, contact your administrator before changing firmware or encryption settings.
Free Up Storage Space
Windows 11 requires a storage device of at least 64 GB, but the upgrade also needs temporary working space.
Windows may need room to:
- Download installation files
- Unpack the upgrade
- Store temporary setup data
- Preserve rollback files
- Install updates
Open:
Settings > System > Storage
Remove unnecessary temporary files and move large personal files if the drive is nearly full.
Do not manually delete Windows system folders such as WinSxS.
Connect a Laptop to Power
If you are upgrading a laptop, connect it to AC power.
Do not depend on battery power during a major OS installation.
Also avoid beginning the upgrade immediately before a deadline, meeting, trip, or other situation where you cannot tolerate downtime.
The PC will restart several times.
Disconnect Unnecessary USB Devices
You can reduce potential driver conflicts by disconnecting hardware you do not need during the upgrade.
Consider unplugging:
- External storage drives
- Printers
- USB audio interfaces
- Capture cards
- Unnecessary hubs
- Older USB adapters
- Specialty controllers
Keep the keyboard, mouse, display, network connection, and anything essential.
Reconnect other devices after Windows 11 is working.
Windows 10 to Windows 11 Upgrade Methods Compared
| Method | Best for | Keeps files and apps | Ease | When to use |
|---|---|---|---|---|
| Windows Update | Most home users with eligible PCs | Yes | Easiest | Use this first if Windows 11 is offered normally |
| Installation Assistant | Eligible PCs not yet showing the upgrade in Windows Update | Yes | Easy | Use when the PC qualifies but Windows Update is not offering Windows 11 |
| Installation media | Troubleshooting or upgrading from a USB installer inside Windows 10 | Yes, if you run setup.exe and choose to keep them |
Moderate | Use when Windows Update or Installation Assistant is not convenient |
Method 1: Upgrade Through Windows Update
Microsoft reference: Ways to install Windows 11
This is Microsoft’s recommended method.
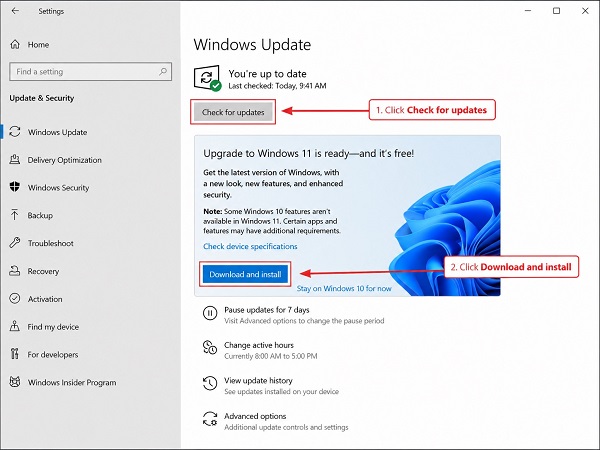
On Windows 10:
- Click Start.
- Open Settings.
- Select Update & Security.
- Open Windows Update.
- Click Check for updates.
If Windows 11 is ready for your PC, Windows Update displays the upgrade.
Click:
Download and install
Read the license terms and select:
Accept and install
Windows downloads and prepares Windows 11.
When Windows says a restart is required, save your work and click:
Restart now
The computer will restart several times.
Do not force it off because the progress percentage appears to pause.
When installation finishes, sign in at the Windows 11 sign-in screen.
What If Windows Update Does Not Offer Windows 11?
There are several possible reasons.
The PC Does Not Meet the Requirements
Run PC Health Check.
If it reports unsupported hardware, identify the exact requirement before doing anything else.
Windows 10 Has Pending Updates
Install all available Windows 10 updates and restart.
Then check Windows Update again.
Microsoft Has Applied a Compatibility Hold
A PC can meet the minimum hardware requirements but still have a known driver, application, or hardware compatibility issue.
Microsoft may temporarily prevent the Windows 11 upgrade from being offered until the problem is resolved.
If Windows Update says the PC is eligible but the upgrade is not ready, waiting can be safer than forcing it.
Eligibility Has Not Refreshed Yet
If you recently enabled TPM or Secure Boot, restart the PC, run PC Health Check again, and check Windows Update again later.
Method 2: Use the Windows 11 Installation Assistant
Microsoft reference: Ways to install Windows 11
If the PC is eligible but Windows Update is not offering Windows 11, Microsoft’s Windows 11 Installation Assistant is another supported method.
Microsoft still recommends Windows Update first.
Download the Installation Assistant only from Microsoft’s official Windows 11 download page.
Then:
- Run Windows 11 Installation Assistant.
- Approve administrator permission.
- Let the tool check compatibility.
- If the PC qualifies, click Accept and install.
- Wait for Windows 11 to download and prepare.
- Click Restart now when prompted.
- Let the computer restart as many times as necessary.
- Sign in after the installation finishes.
If the Installation Assistant asks you to use PC Health Check, run the compatibility test and then return to the Assistant.
Method 3: Upgrade Using Windows 11 Installation Media
Microsoft reference: Ways to install Windows 11
Microsoft also supports using Windows 11 installation media for an in-place upgrade.
This can be useful when:
- Windows Update has problems
- You want installation media available
- The Installation Assistant is not convenient
- You need to upgrade more than one compatible PC
Create official Windows 11 installation media from Microsoft.
While still signed into Windows 10:
- Connect the Windows 11 USB media.
- Open File Explorer.
- Open the USB drive.
- Run:
setup.exe- Approve User Account Control.
- Follow Windows 11 Setup.
- At Ready to install, review what will be kept.
- Choose Keep personal files and apps for a normal in-place upgrade.
- Continue with installation.
- Allow the PC to restart and finish the upgrade.
The important point is that you launch setup.exe from inside Windows 10 for an in-place upgrade.
Do Not Boot From USB If You Want to Keep Everything
Running setup.exe from Windows 10 can preserve personal files, installed applications, and Windows settings when you select the appropriate option.
Booting directly from Windows installation media is commonly used for a clean installation.
Microsoft warns that a fresh installation from bootable media can wipe the drive.
If your goal is simply how to upgrade from Windows 10 to Windows 11 without losing files, do not choose the clean-install route casually.
Make a full backup before using bootable media.
Keep Personal Files and Apps vs Other Options
During an in-place setup, you may see several choices.
Keep Personal Files and Apps
This is normally the correct choice for a standard upgrade.
It attempts to preserve:
- Personal files
- Installed programs
- Windows settings
Keep Personal Files Only
Personal files remain, but applications and Windows settings are removed.
Nothing
Everything is removed.
Do not choose this unless you intentionally want a fresh installation and have already backed up anything important.
Read the final Ready to install screen carefully before continuing.
Will Upgrading Delete My Files?
A supported in-place Windows 10 to Windows 11 upgrade is designed to preserve your personal files.
Windows Update and Installation Assistant normally keep files and applications.
Installation media can also preserve them when you run Setup from inside Windows 10 and choose Keep personal files and apps.
There is still a possibility of something going wrong during any major operating-system change, which is why a backup matters.
Will My Programs Still Work?
Many Windows 10 applications work on Windows 11.
However, compatibility is not guaranteed for every program.
Pay extra attention to:
- Legacy accounting software
- Old printer utilities
- VPN clients
- Security software
- Hardware-monitoring tools
- Audio production software
- Older games
- Specialist business applications
- Old device drivers
- Virtualization software
If one application is essential for work, check its developer’s Windows 11 support information before upgrading.
Will My Drivers Transfer?
Windows tries to migrate compatible drivers during the upgrade.
Windows Update may install newer Windows 11 drivers afterward.
Before upgrading, it can be useful to check your PC manufacturer’s support page for important components such as:
- Chipset
- Graphics
- Wi-Fi
- Bluetooth
- Audio
- Storage controller
You do not need to manually update every driver just because you are upgrading.
Focus on devices with known compatibility problems.
What Happens to Windows 10 Home or Pro?
The free upgrade normally keeps the matching edition.
Windows 10 Home becomes Windows 11 Home.
Windows 10 Pro becomes Windows 11 Pro.
If you need to understand higher editions for specialist systems, see Windows 11 Pro vs Pro for Workstations.
Do not buy a Pro license simply because you are upgrading from Windows 10 Home unless you actually need Pro features.
What If PC Health Check Says TPM 2.0 Is Missing?
First determine whether TPM is truly absent or simply disabled.
On many systems:
- Intel calls firmware TPM PTT
- AMD systems may call it fTPM
Enter UEFI or BIOS and look under sections such as Security, Trusted Computing, Advanced, or CPU Configuration.
Enable the correct feature if your hardware supports it.
Save and restart.
Then run:
tpm.mscagain.
Do not update the BIOS solely because TPM is turned off. Enable the existing setting first.
What If Secure Boot Is Unsupported?
Secure Boot depends on UEFI firmware.
If System Information shows:
BIOS Mode: Legacy
the PC may use an older boot configuration.
Changing to UEFI can involve disk partitioning and boot configuration.
Do not blindly change the firmware setting.
Back up your data and follow instructions for your exact computer or motherboard.
If the PC already uses UEFI, Secure Boot may simply need to be enabled.
What If the Processor Is Unsupported?
An unsupported CPU is different from a disabled TPM setting.
There may be no firmware switch that makes an unsupported processor officially supported.
Check the exact processor model, not just a family name such as Core i5, Core i7, Ryzen 5, or Ryzen 7.
The generation and specific model matter.
If Microsoft says the processor is unsupported, safer options include using an applicable Windows 10 extended-security path if eligible, upgrading the hardware where practical, or replacing the PC with a Windows 11-compatible system.
Should You Bypass Windows 11 Requirements?
I do not recommend making a TPM, Secure Boot, or CPU bypass the normal upgrade method.
Microsoft explicitly warns that installing Windows 11 on hardware that does not meet the requirements is unsupported.
Unsupported devices can experience compatibility problems and are not guaranteed to receive updates, including security updates.
The fact that a workaround can make Setup continue does not mean Microsoft considers the system supported afterward.
For a primary work computer, banking PC, or machine that stores important information, use a supported configuration whenever possible.
What If the Windows 11 Upgrade Is Stuck?
First determine where the problem occurs.
Stuck While Downloading
Check:
- Internet connection
- Free storage
- Windows Update
- VPN
- Metered connection settings
Restart Windows and check for updates again if the download has clearly failed.
Stuck During Installation
Do not force the PC off merely because the percentage remains unchanged for some time.
A major Windows upgrade can spend a long time processing applications, drivers, and migration data.
If Setup eventually fails or rolls back automatically, note the error code.
PC Reverts to Windows 10
This can indicate a driver, application, storage, or compatibility problem.
Disconnect unnecessary devices, free storage, and update important hardware drivers before trying again.
Repair Windows Before Retrying a Failed Upgrade
If Windows 10 has damaged system files, repair them before another upgrade attempt.
Open Command Prompt as administrator and run:
DISM /Online /Cleanup-Image /RestoreHealthWhen it finishes, run:
sfc /scannowRestart the PC.
If SFC reports repair problems, see Windows Resource Protection Error: How to Fix It before retrying the Windows 11 upgrade.
What If Windows 11 Says “What Needs Your Attention”?
Windows Setup may block the upgrade because of a compatibility issue.
The message can identify:
- An incompatible application
- A driver
- Hardware
- A Windows feature
- Another setup condition
Do not bypass the warning without understanding it.
Update or remove the identified software when appropriate and then restart Setup.
Compatibility blocks exist because Microsoft or a vendor has identified a problem that can affect the upgrade.
Check Windows 11 Activation After Upgrading
After Windows 11 starts:
- Open Settings.
- Select System.
- Open Activation.
Windows should show that it is activated.
If it is not, connect to the internet, restart, check that the edition is correct, and use Activation Troubleshooter if available.
Do not buy another license immediately if the same PC was properly activated before the upgrade.
Install Windows 11 Updates After the Upgrade
Once you reach the desktop:
- Open Settings.
- Select Windows Update.
- Click Check for updates.
- Install available updates.
- Restart when required.
- Check again.
Windows may require several rounds of updates after a major upgrade.
You can also check Advanced options > Optional updates for relevant device drivers.
Check Device Manager
Right-click Start and open:
Device Manager
Look for:
- Yellow warning symbols
- Unknown devices
- Missing network adapters
- Missing audio devices
- Display-driver problems
If everything works normally, do not update drivers only because a newer version number exists.
Use Windows Update and official manufacturer support pages.
Check Your Important Apps
Test the software and hardware you rely on:
- Browser
- Office applications
- Printer
- Scanner
- VPN
- Audio
- Webcam
- Microphone
- Games
- Work software
- Backup application
It is easier to troubleshoot while the upgrade is still recent and you remember what changed.
Can You Go Back to Windows 10?
Windows 11 normally provides a limited rollback period after an upgrade.
Microsoft currently says the Go back option is available for 10 days after upgrading, provided the files needed for rollback have not been removed.
Open:
Settings > System > Recovery
Look for:
Go back
If it is available, follow the prompts.
Remember that Windows 10 reached end of support on October 14, 2025. Going back may temporarily solve a compatibility problem, but it returns the PC to an operating system outside normal support.
Do Not Delete Windows.old Immediately
After an in-place upgrade, Windows can keep the previous installation in:
C:\Windows.oldThat data is important for the normal rollback process.
If you immediately remove the previous Windows installation through Disk Cleanup or Storage settings, you can lose the Go back option before the normal rollback period ends.
Wait until you are confident Windows 11 is stable before reclaiming that space.
What Should You Do After Moving to Windows 11?
Once everything is stable:
- Install Windows updates
- Check activation
- Verify drivers
- Test important applications
- Confirm backups
- Review privacy settings
- Review startup apps
- Remove software you no longer need
If the upgraded PC has accumulated years of unnecessary startup programs and manufacturer utilities, see How to Debloat Windows 11 Safely Without Breaking It.
Do not run aggressive debloat scripts immediately after upgrading.
Let Windows finish its updates and confirm that your software works first.
Frequently Asked Questions
How do I upgrade from Windows 10 to Windows 11?
Open Settings > Update & Security > Windows Update, click Check for updates, and select Download and install if Windows 11 is offered for your PC.
Is Windows 11 still free for Windows 10 users?
Yes. Microsoft currently states that Windows 10 to Windows 11 upgrades are free for eligible devices.
Will upgrading Windows 10 to Windows 11 delete my files?
A normal supported in-place upgrade is designed to keep personal files. Back up important data before starting anyway.
Can I upgrade Windows 10 to Windows 11 without losing programs?
Yes. Windows Update, Installation Assistant, and an in-place installation-media upgrade can preserve applications when you use the normal keep-files-and-apps option.
How do I know if my PC supports Windows 11?
Use Microsoft’s PC Health Check app. It checks Windows 11 eligibility and can report why a PC does not meet the requirements.
Does Windows 11 require TPM 2.0?
Yes. TPM 2.0 is part of Microsoft’s minimum Windows 11 requirements.
Does Windows 11 require Secure Boot?
Windows 11 requires UEFI firmware with Secure Boot capability.
Can I upgrade if TPM is disabled?
If the computer has TPM 2.0 or firmware TPM but it is disabled, enabling it in UEFI or BIOS may make the system eligible.
Why is Windows 11 not showing in Windows Update?
The PC may have pending Windows 10 updates, unsupported hardware, a compatibility hold, or Windows Update may not have refreshed eligibility yet.
Can I use Installation Assistant instead of Windows Update?
Yes, on a compatible device. Microsoft recommends Windows Update first but also supports Windows 11 Installation Assistant.
Can I upgrade using a USB drive?
Yes. Create official Windows 11 installation media, insert it while Windows 10 is running, and launch setup.exe for an in-place upgrade.
Should I boot from the USB to upgrade?
Not if your goal is to preserve the existing Windows installation. Booting from installation media is commonly used for a fresh installation and can erase files and apps.
Can I upgrade an unsupported PC?
Workarounds exist, but Microsoft does not recommend installing Windows 11 on unsupported hardware. Unsupported devices can have compatibility problems and are not guaranteed to receive updates.
Will Windows 10 still work after end of support?
Yes, Windows 10 can continue running, but normal free support and security updates ended on October 14, 2025.
Will Windows 10 Pro become Windows 11 Home?
Normally no. The free upgrade moves the PC to the corresponding Windows 11 edition.
How long can I go back to Windows 10?
Microsoft currently provides the normal Go back option for 10 days after an upgrade, provided the necessary previous-installation files remain available.
Use Windows Update First and Keep the Upgrade Supported
For most eligible PCs, the best way to upgrade from Windows 10 to Windows 11 is still Windows Update.
Check compatibility with PC Health Check, install all pending Windows 10 updates, back up important files, verify that TPM and Secure Boot requirements are satisfied, and then allow Windows Update to install Windows 11 when it is offered.
If the PC is compatible but Windows Update does not offer the upgrade, Microsoft’s Installation Assistant is a reasonable second option. Official installation media can also perform an in-place upgrade when you run setup.exe from inside Windows 10 and choose to keep your personal files and apps.
I would avoid hardware-requirement bypasses on a primary computer. An unsupported installation may run, but Microsoft does not guarantee normal support or updates for hardware that fails the Windows 11 requirements.
Once the upgrade finishes, check Windows activation, Windows Update, drivers, storage, and the applications you depend on before removing the old Windows installation files.
